

To celebrate Lunar New Year (the true New Year holiday in Vietnam), I’m offering 50% off the annual subscription. The offer ends soon; grab it now to get full access to nearly 200 high-quality data engineering articles.
Intro
Orchestrating the data pipeline is as crucial as its task logic and performance. Luckily, we don’t have to do that from scratch; many available tools can help us.
Among them, Airflow appears to be the dominant solution, thanks to its openness and active community. However, as data engineers, writing DAG files was not enough; we needed to understand the underlying concepts to operate the tool confidently.
This article will take a closer look at one of the most important aspects of Airflow: the mechanism by which tasks are run, Airflow’s executor.
We first briefly revisit Airflow, and then we explore the executor and its available options.
The History
Apache Airflow was created in 2014 at Airbnb when the company was dealing with massive and increasingly complex data workflows. At the time, existing orchestration tools were either too rigid, lacked scalability, or couldn’t accommodate the dynamic nature of data pipelines. To address this challenge, Maxime Beauchemin, a data engineer at Airbnb, spearheaded the creation of Airflow.
Airflow quickly gained traction and, in 2016, joined the Apache Software Foundation, becoming an open-source project with a robust and growing community.
If you've joined a new company these days, you're likely to work with Airflow.
Overview
Orchestrating a complete data pipeline presents numerous challenges. When should we schedule the data retrieval from a third-party API? How do we effectively manage dependencies between the API call and the data processing job? What happens in the event of a failure? Can we observe it? If so, can we retry?
Apache Airflow simplifies this problem by allowing engineers to define workflows as code and automating their execution.
At its core, Airflow operates on the concept of Directed Acyclic Graphs (DAGs) to model workflows. It is essentially a roadmap for the workflow and contains two main components:
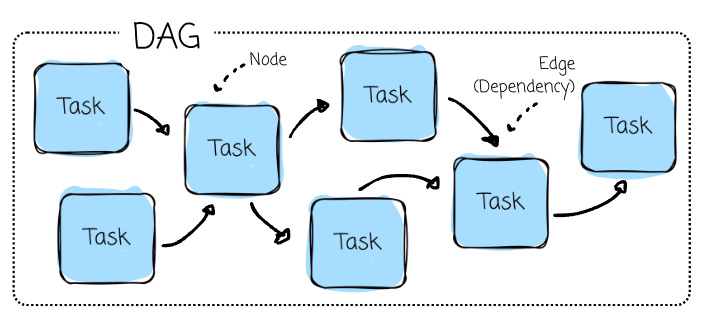
Tasks (Nodes) are individual work units, such as running a query, copying data, executing a script, or calling an API.
Dependencies (Edges): The relationships between tasks that define their execution order (e.g., preprocessing is executed only after retrieving data from a third-party API).
Airflow ensures tasks are executed sequentially or in parallel (based on their dependencies), automatically manages retries on failure (based on their retry configuration), and thoroughly logs task execution for monitoring and debugging purposes.
The Internals
There are several components inside Airflow:
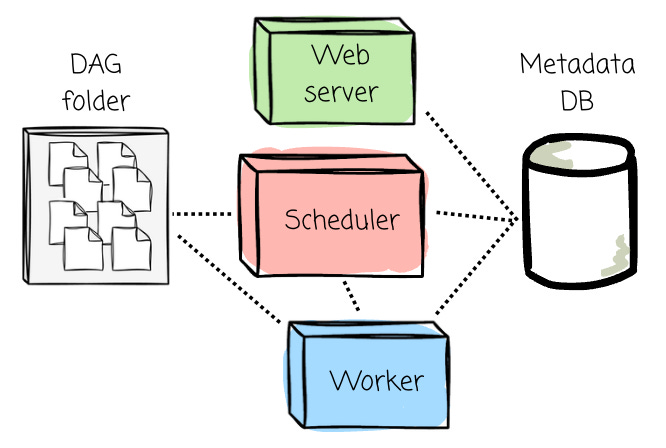
Scheduler: The component responsible for parsing DAG files, scheduling tasks, and queuing them for execution based on their dependencies and schedules. The executor logic runs inside the scheduler.
Web Server provides the Airflow UI, allowing users to visualize workflows, monitor task execution, inspect logs, and trigger DAG runs.
Metadata Database: A central database that stores all metadata, including DAG definitions, task states, execution logs, and schedules. It’s essential for tracking the history of workflows.
DAG folders: It contains DAG files defined by users.
Workers: Components that execute the tasks assigned by the executor.
The executor is our main dish today, and we will discuss it very soon
Workflow Between Components
The workflow between Airflow’s components can be broken down into the following steps:
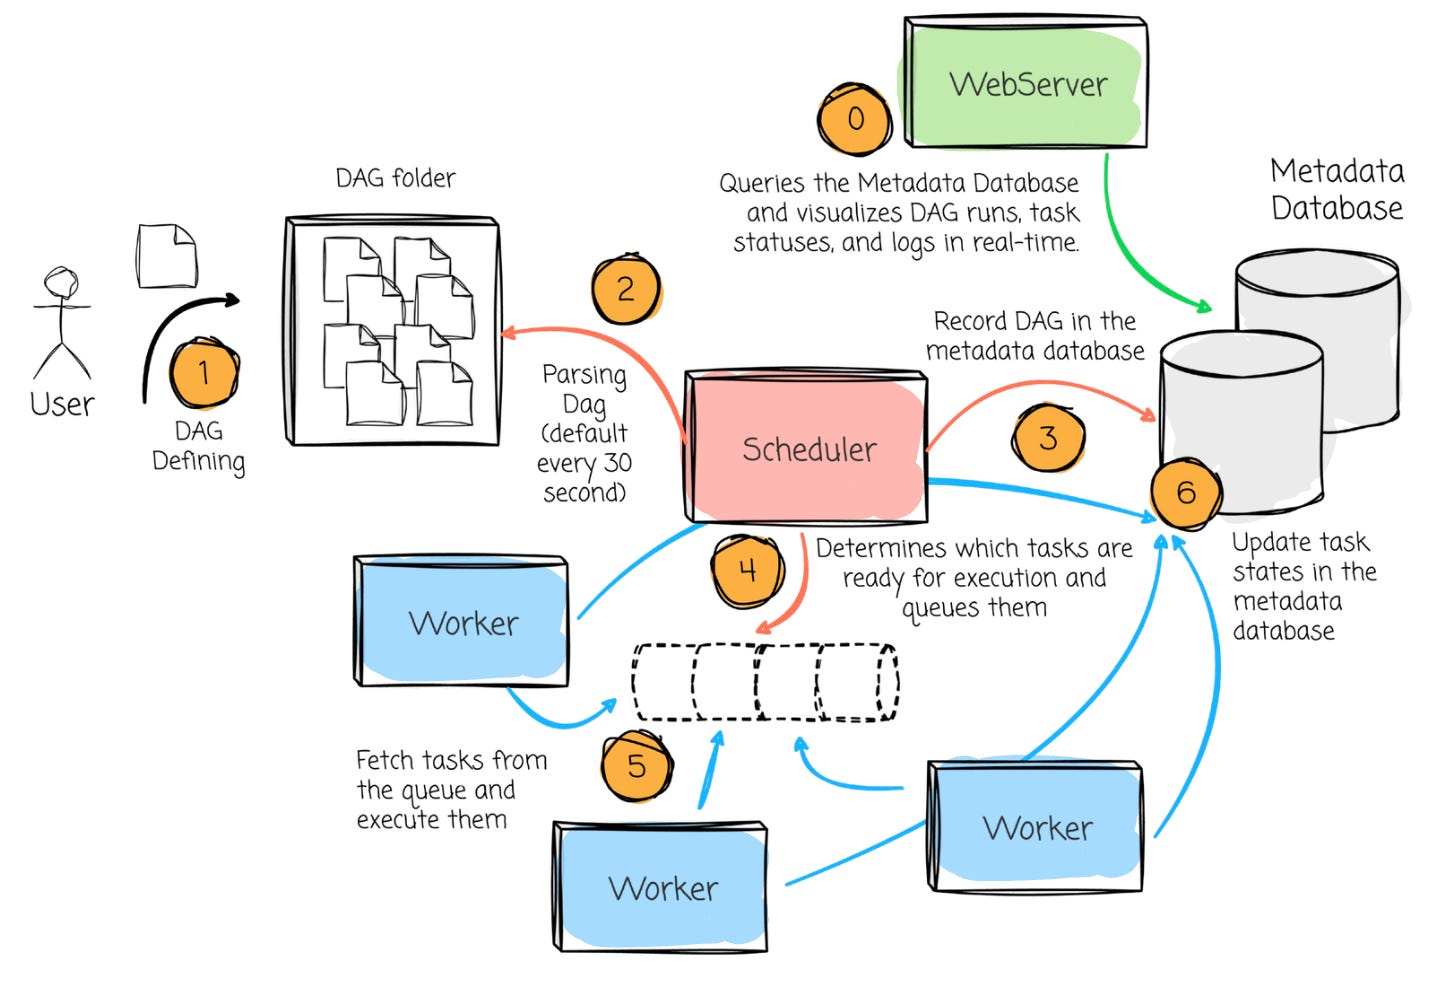
DAG defining: The users define the DAG with desired tasks and logic, including when to begin running it and the scheduled interval.
DAG Parsing: The Scheduler scans the DAG directory, parses the DAG file, and loads them into the Metadata Database.
Scheduling: Based on the DAG definitions and schedule intervals, the Scheduler determines which tasks are ready for execution and queues them.
Task Execution: The Executor fetches the queued tasks and assigns them to available Workers. The Workers execute the tasks, and task states are updated in the Metadata Database.
Monitoring: The Web Server queries the Metadata Database and visualizes DAG runs, task statuses, and logs in real-time. Users can monitor task progress, inspect logs, or trigger manual DAG runs from the UI.
Retries and State Updates: If a task fails, the Scheduler ensures retries are handled according to the task configuration. The Executor updates task states in the database until all tasks are completed successfully or fail beyond retry limits.
This article is sponsored by Astronomer. At Astronomer, a team of just five data engineers manages 27,000 daily tasks powering 18+ data products. After a series of architectural changes, they reduced DAG failure rates by 81%. On August 21, they’re sharing exactly how they did it, and how you can apply the same strategies to make your own pipelines more reliable. You’ll learn how to:
Use Airflow Asset scheduling to prevent upstream data issues
Orchestrate cross-DAG dependencies with a Control DAG
Set up centralized observability to monitor SLAs and debug faster
Deployment
Deploying Airflow ranges from running a lightweight local instance for testing and development to setting up a robust, scalable, and production-ready environment. Here's an overview of the deployment process:
On a single machine
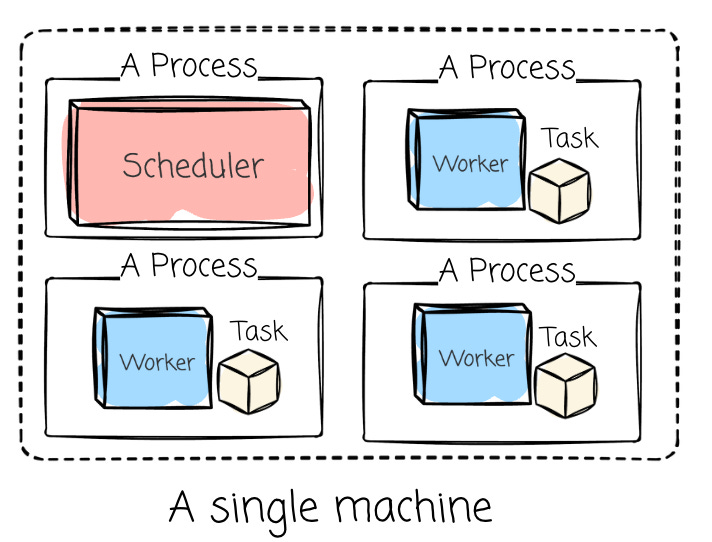
Airflow can be deployed directly on a single machine (airflow standalone) for testing and development. This setup will initiate all the required components (scheduler, web server, and database) as separate processes on our machine.
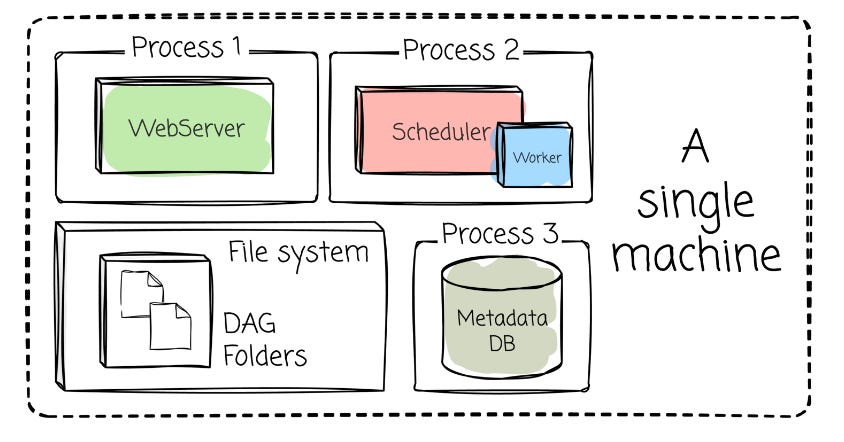
Another way to deploy Airflow on a single machine is by separting each process into a separate container (via Docker or on a local Kubernetes cluster such as Minikube)
However, a single-machine deployment is insufficient when operating Airflow in production, which requires scalability, availability, and fault tolerance.
Distributed Deployment
Airflow can be deployed in a distributed architecture; components are deployed independently and redundantly; each element is live on a separate machine and can be optionally deployed in multiple instances on different machines. (e.g., scheduler and webserver are on two other machines, the scheduler can have three instances deployed on three machines)
This setup enables better load distribution, making it well-suited for handling large-scale workflows. The most common approach for deploying Airflow's distributed architecture that I observed is using Kubernetes.
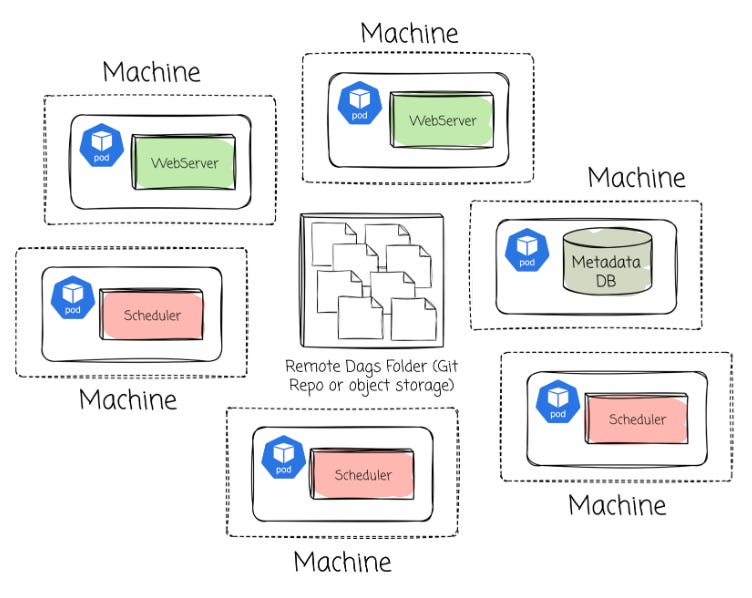
If you use Airflow managed by a cloud vendor like AWS or Google, your Airflow environment is deployed on a Kubernetes cluster, and all the DAG files are stored in the object storage (S3 for AWS and GCS for Google Cloud)
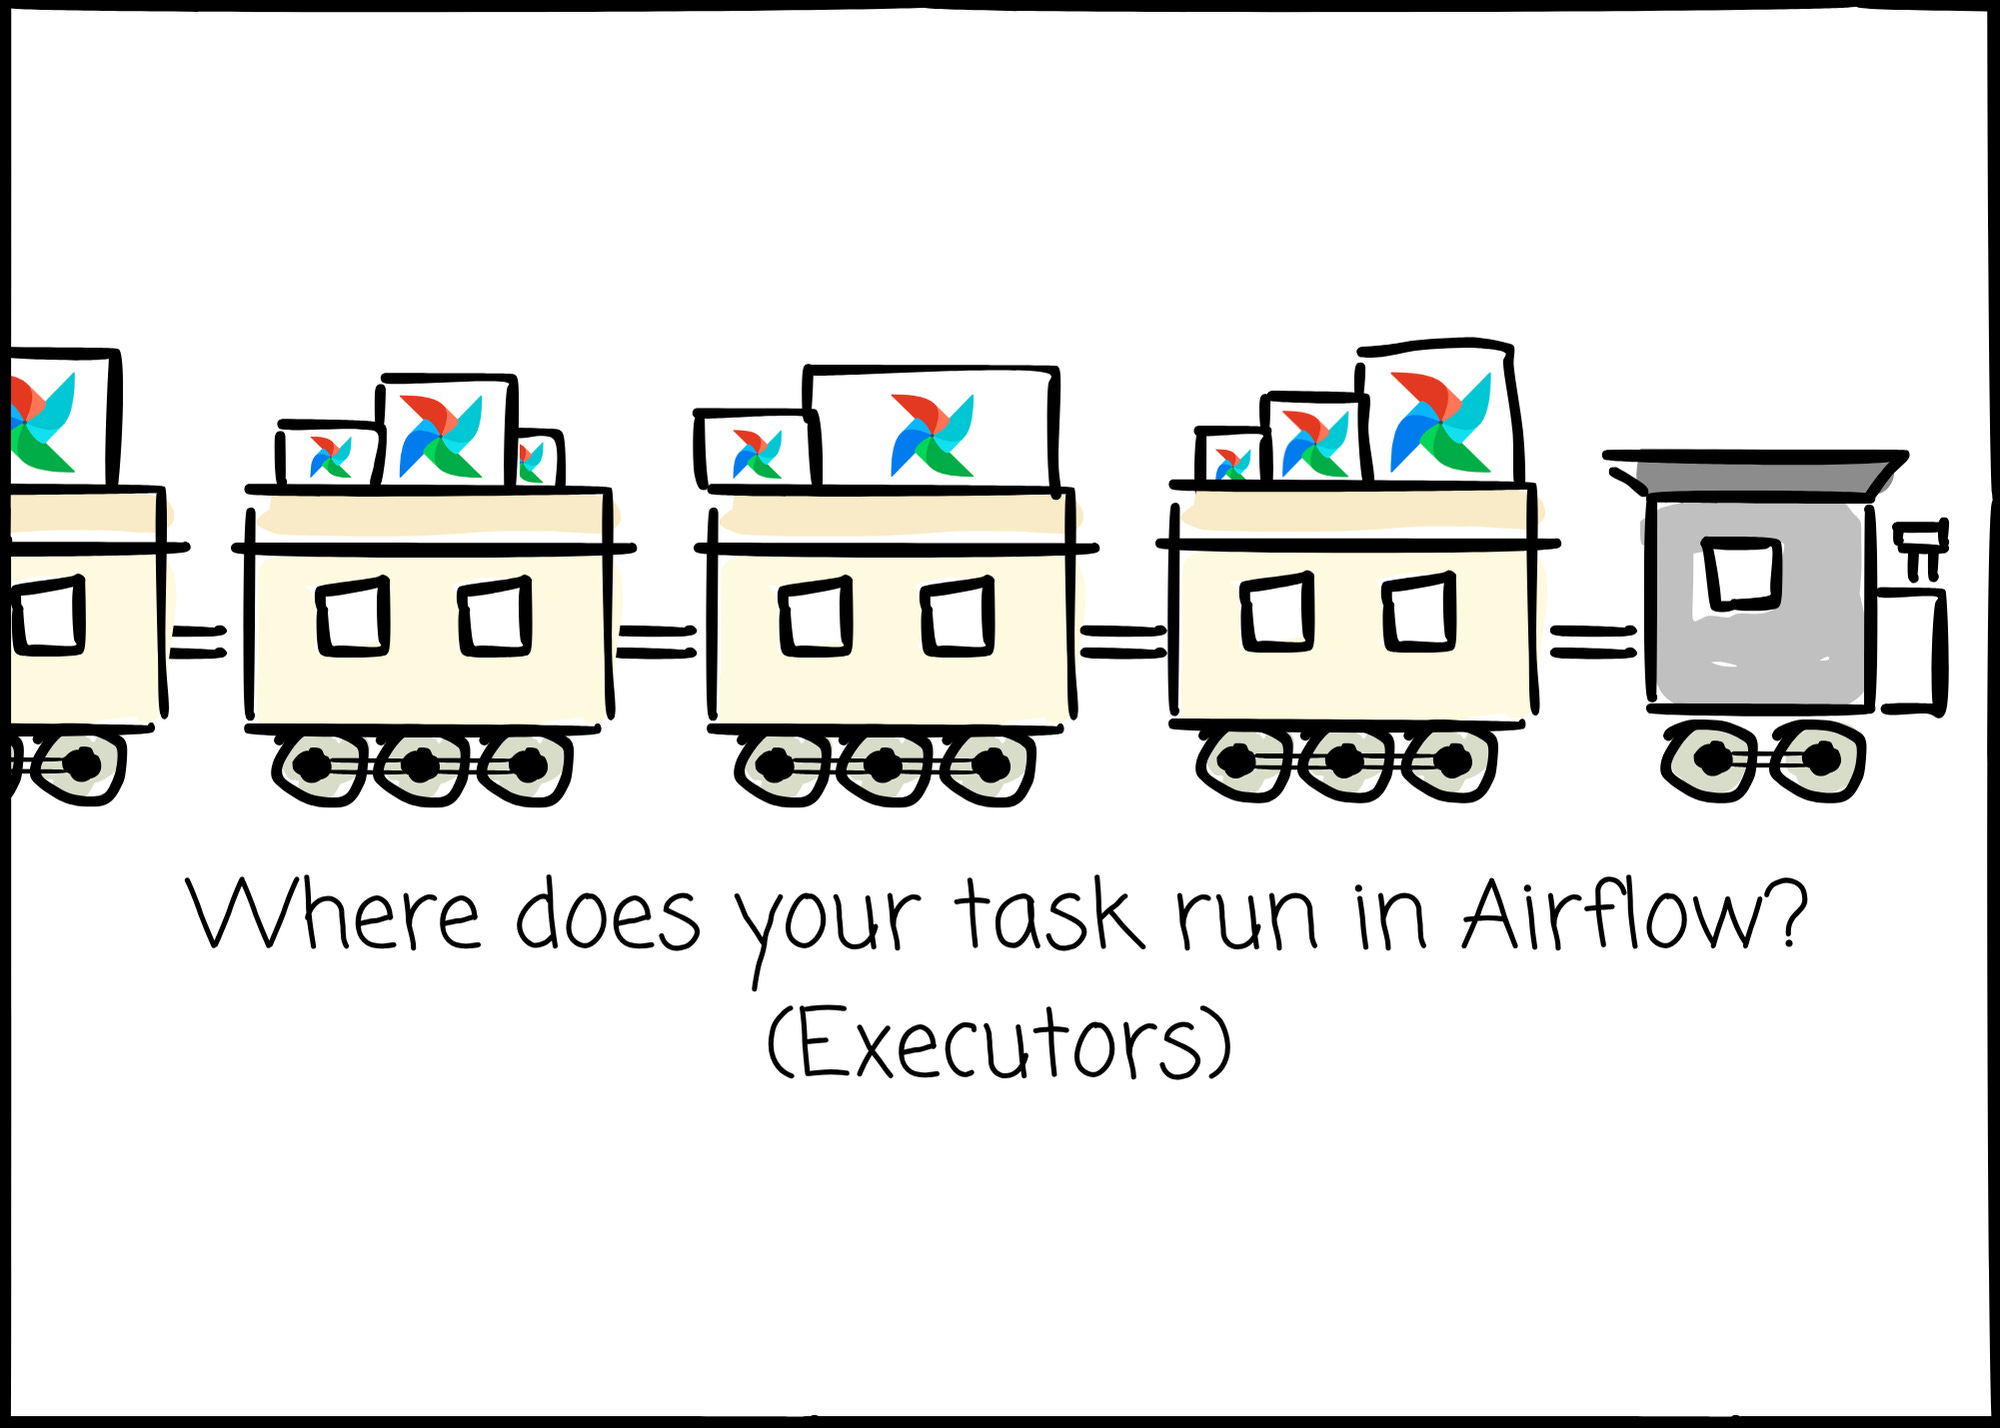
Executors
Now, the main dish.
Executors in Airflow are responsible for determining where and how tasks are executed. Different executors offer varying levels of scalability, isolation, and complexity.
SequentialExecutor
Categorized as Local Executor, it is replaced by the LocalExecutor in Airflow 3
This executor runs tasks sequentially (one after another) within a single process on the same machine as the scheduler. This executor is most used for development and local testing. It's simple but unsuitable for production due to its lack of parallelism.
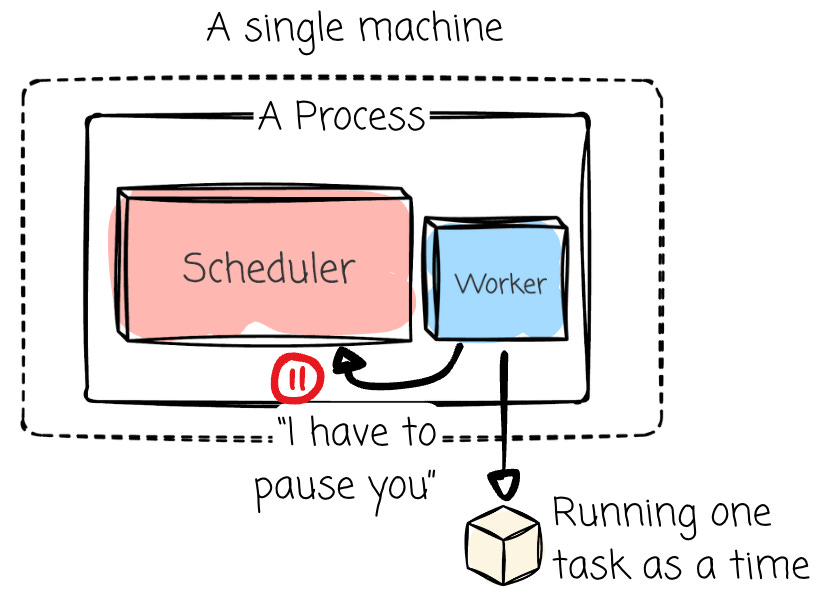
A critical operational detail is that this executor pauses the scheduler while a task is running. This characteristic is a significant concern for production environments, as it prevents the scheduler from continuously monitoring or queuing new tasks.
The SequentialExecutor is also unique in its ability to operate with SQLite as its database backend, a choice that aligns with its single-task nature due to SQLite's lack of support for multiple concurrent connections.
Pros
Its greatest strength is simplicity, requiring no external dependencies or complex configurations.
Cons
Can’t run tasks in parallel
LocalExecutor
Categorized as Local Executor
The LocalExecutor represents an advancement over the SequentialExecutor by introducing parallelism while maintaining a relatively simple setup on a single machine. Concurrency is achieved through multiple processes on a single machine. It is suitable for small—to medium-sized workflows that require concurrency but don't need distributed execution.
To support this parallelism, a robust database backend such as MySQL or PostgreSQL is required, as SQLite does not handle the multiple connections necessary for concurrent operations.
The LocalExecutor has modes:
Unlimited Parallelism (
parallelism == 0): In this mode, a new process is spawned for every task submitted. Upon task completion, the process terminates. This represents a direct, on-demand approach to task execution.Limited Parallelism (
parallelism > 0): This is the more common configuration for a production environment. A fixed number of worker processes (equal to theparallelism) are pre-spawned at startup. These workers continuously pull tasks from the queue, remaining active throughout the executor's lifecycle.
When there are multiple Schedulers, each will run a local executor. This means tasks will be distributed across the Schedulers’ machines.
Pros
The simplicity
Can leverage multiple CPU cores on the host machine, leading to higher concurrency compared to the SequentialExecutor
Cons
Limited by the resources (CPU, RAM, etc.) of the Scheduler machines. More task processing capability means adding more Scheduler machines.
CeleryExecutor
Categorized as Remote Executor
The CeleryExecutor allows us to enter distributed systems and horizontal scaling. It relies on Celery, a robust distributed task queue. Compared to the two above executors, the workers who run the task are separate from the scheduler machines.
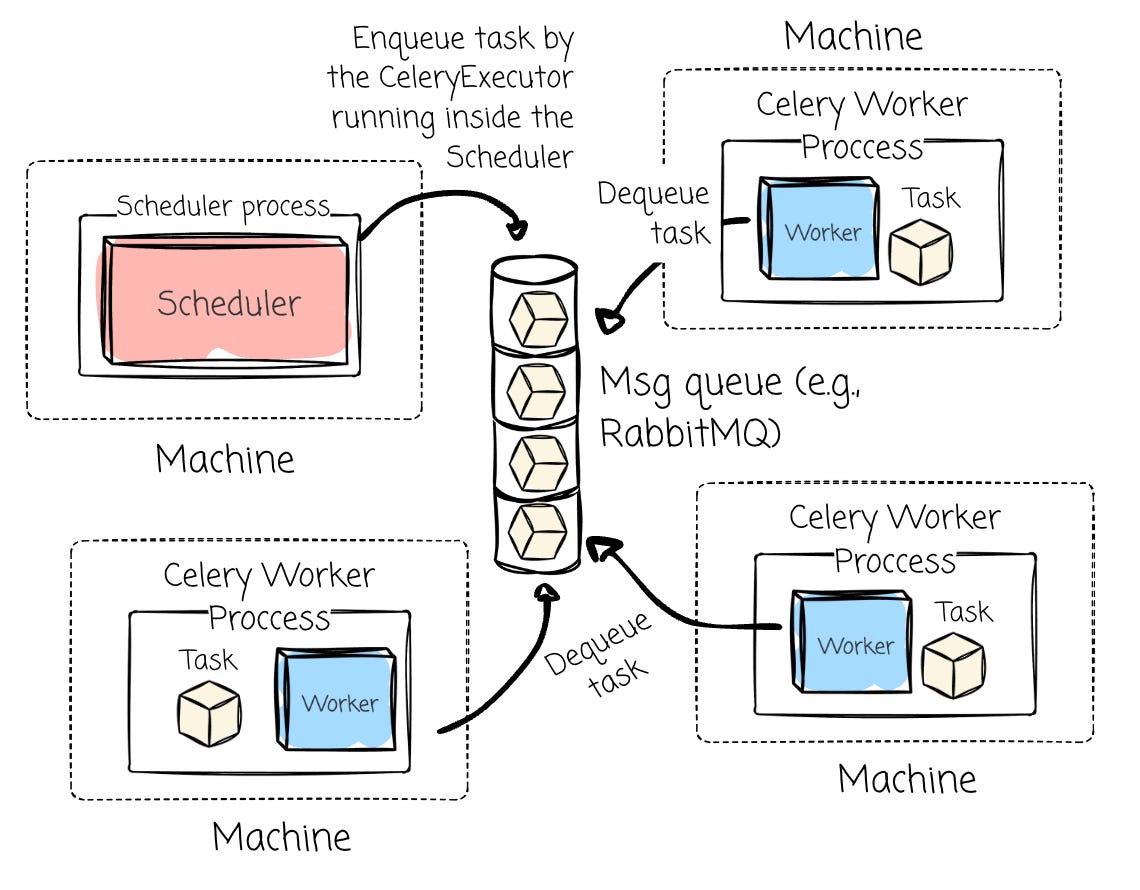
The CeleryExecutor setup involves:
A message broker (most commonly RabbitMQ or Redis)
Celery workers
Celery workers are typically long-running processes that continuously run to pick up tasks, allowing more than one task to run concurrently on a worker. To scale the task-running capability, we add more machines that run Celery worker processes. Similar to the LocalExecutor, it requires a robust, non-SQLite database (e.g., MySQL or PostgreSQL)
Pros
Decoupling the task running process from the Scheduler.
Horizontal scaling by adding more machines that run the Celery workers.
Cons
More components compared to the local executors → More maintenance overhead
Noisy Neighbor: A heavy task could affect other functions on the shared machine that runs the Celery worker.
Not so good resource utilization as Celery workers could stay idle: running a fixed number of Celery workers continuously can lead to underutilized resources when few tasks are running.
The overhead of scaling worker machines.
KubernetesExecutor
Categorized as Containerized Executor
This executor is designed for cloud-native and containerized environments. This executor dynamically creates Kubernetes pods for each task. For me, this one provides the best resource isolation, scalability, and fault tolerance.
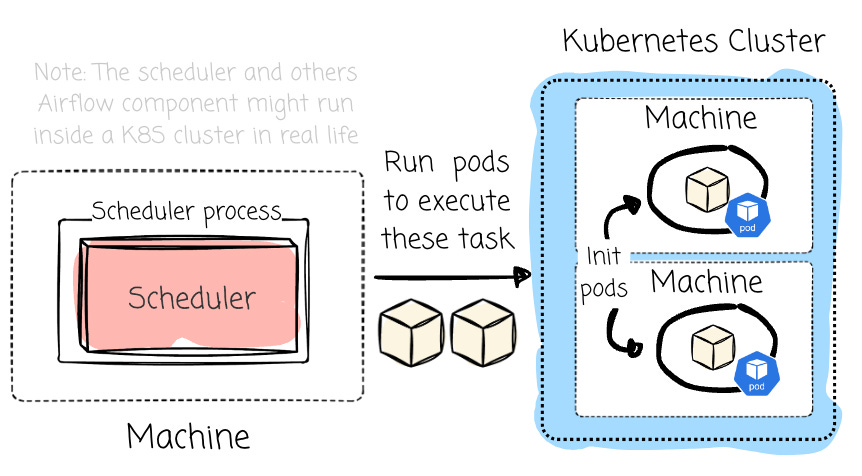
When the Airflow scheduler senses that a task is ready for execution, it requests a new pod from the Kubernetes API. This newly created pod then executes the task, reports its result back to the Airflow metadata database, and terminates upon task completion (users can choose to persist the pod for debugging later)
Pros
Better resource utilization: resources are consumed only when tasks are actively running, leading to cost savings during idle periods.
Better isolation: each task can have its own pod with configurable resources. Unlike the above executors, KubernetesExecutor allows for better Python dependencies, as different tasks (pods) can have different sets of dependencies.
Cons
The cold start: The Kubernetes pod needs to be initiated (e.g., pull the Docker image, run) to run the task; it could take a while compared to the above executors before executing your tasks.
Requires strong knowledge of containerization and Kubernetes, which potentially requires more resources to manage (e.g., SRE teams)
Hard to test as it requires users to have a Kubernetes environment.
Multiple Executors
Until Airflow 2.10, an Airflow environment was limited to using a single executor for all its tasks. However, with the introduction of multiple executor support (starting with Airflow 2.10 and later), users can specify different executors for different tasks.
Most of the time, a single executor is sufficient. However, with diverse workloads, the “one size fits all" approach may not be effective. Multiple executors could help here. For example:
Short, Numerous Tasks: Some DAGs might consist of very small tasks. A CeleryExecutor with pre-warmed workers can excel here due to low task startup latency. Small tasks also mean quick-returning resources, limiting the noisy neighbor problems.
Long-Running, Resource-Intensive Tasks: Long-running tasks consume significant CPU/memory on Celery workers, which might lead to "noisy neighbor" problems. With KubernetesExecutor, each task gets its own isolated pod with precisely allocated resources.
Outro
In this article, we first revisit the fundamentals of Airflow and then explore its common executor options, ranging from local ones with simple setups to limiting concurrency with Sequential and Local executors.
We then move on to the distributed option with CeleryExecutor, and finally learn about the most isolated and scalable option with KubernetesExecutor. However, more power comes with more responsibility, as this last one requires strong knowledge of Kubernetes to operate smoothly.
We also learn that Airflow allows us to specify more than one executor in a single environment.
Thank you for reading this far. See you next time.
References
[1] Apache Airflow Official Documentation
[3] Airbnb Engineer, Airflow: a workflow management platform (2015)
This is really good, may I know how or what you use to draw the diagrams? Thanks!
The architecture in Airflow 3 has been updated such that most communication with the metadata dabatabase has to go through an API server. This holds e.g. for the workers.